LLM Plugin
TablePlus has a built-in AI assistant that can write and explain queries for you. It lives in the Assistant tab of the right sidebar and works with the LLM provider or coding agent you choose: OpenAI, Anthropic, Google AI, OpenRouter, DeepSeek, GitHub Copilot, Codex CLI, Ollama, any OpenAI-compatible server, or any agent that supports the Agent Client Protocol (ACP).

Enable the assistant
The assistant is enabled by default. To turn it on or off, do one of the following:
- Open Preferences (
⌘ + ,) > LLM Agent and check or uncheck Enable Assistant Tab on the Right Sidebar. - In the right sidebar, click the settings button and choose Enable LLM Chat.
When the assistant is enabled, the right sidebar shows two tabs: Row and Assistant.
Set up a provider
Open Preferences > LLM Agent. The list on the left shows the built-in providers and any custom ones you added. Select a provider to configure it on the right.
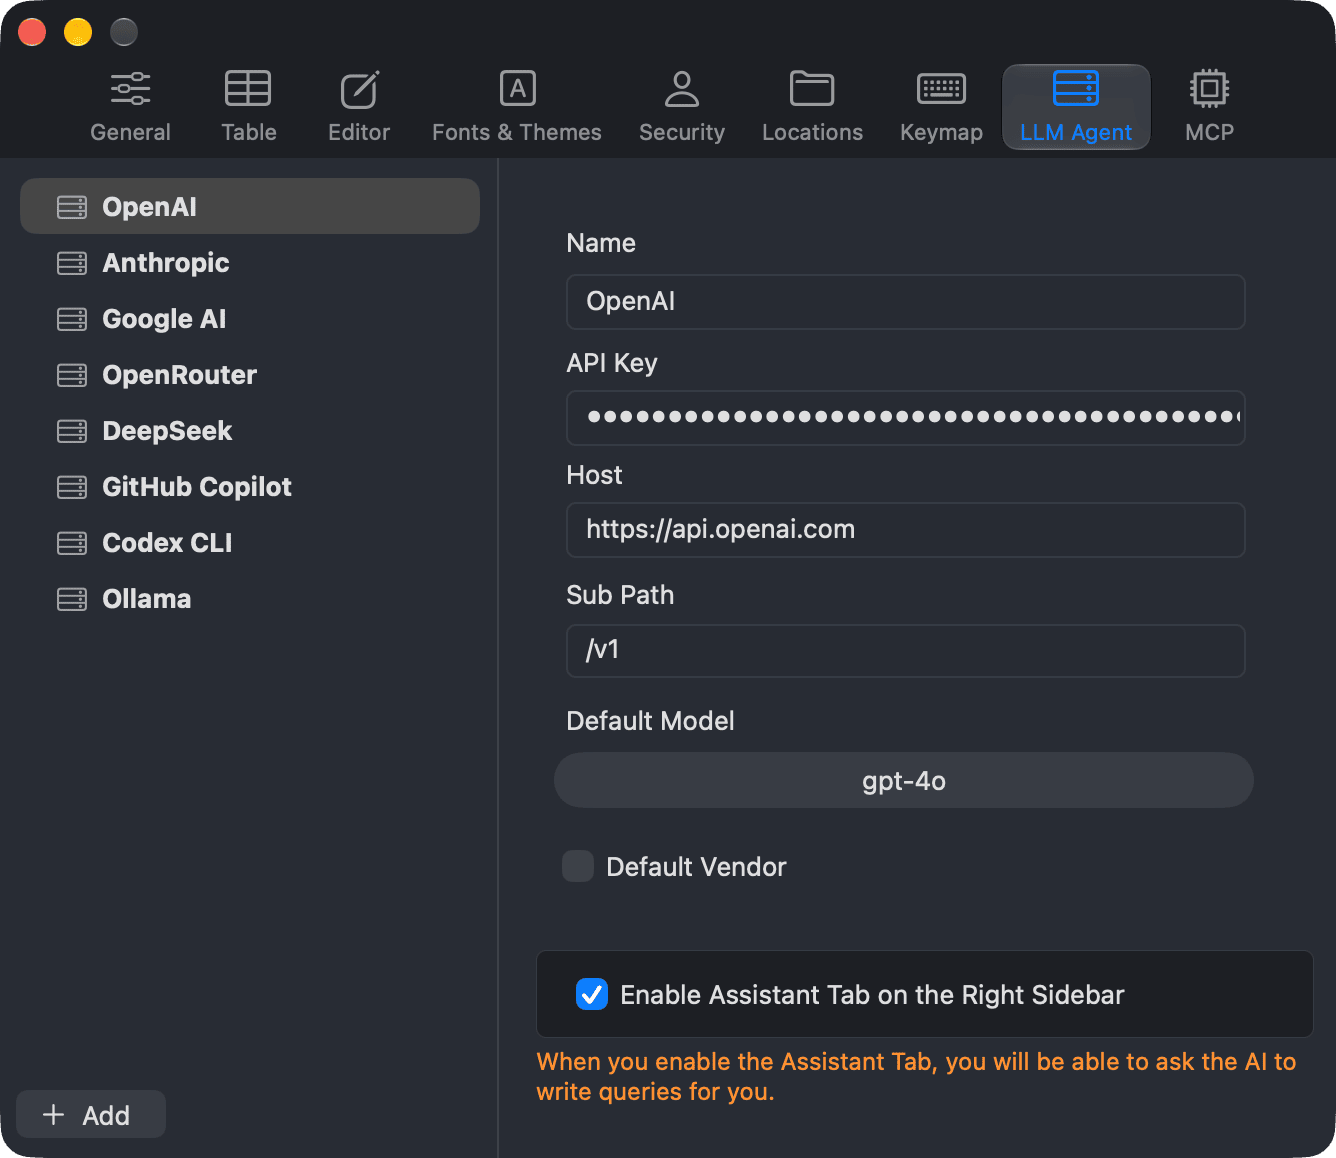
Check Default Vendor on the provider you want new chats to use. You can still switch providers for each chat.
API key providers
OpenAI, Anthropic, Google AI, OpenRouter, and DeepSeek use an API key from the provider:
- Select the provider.
- Paste your key into API Key.
- Choose a Default Model. TablePlus loads the list of models from the provider.
Your API keys are stored in the macOS Keychain.
Ollama
Ollama runs models locally. TablePlus connects to http://localhost:11434 by default.
- Start Ollama and pull a model, for example
ollama pull llama3.2. - Select Ollama and choose a Default Model.
Ollama doesn't need an API key, but TablePlus asks for one before sending a request. Enter any text in API Key.
GitHub Copilot
You need a GitHub account with an active Copilot subscription.
- Select GitHub Copilot and click Connect GitHub.
- Copy the code TablePlus shows, then click Open GitHub Login Page and paste the code to authorize TablePlus.
- When you are signed in, choose a Default Model.
Click Logout to disconnect your GitHub account.
Codex CLI
TablePlus can use the Codex CLI installed on your Mac, signed in with your ChatGPT account.
- Install the Codex CLI.
- Select Codex CLI. TablePlus finds the
codexexecutable automatically and shows its Status, Version, and Path. If it can't find Codex, enter the full path in Path. - Click Sign in with ChatGPT and complete the Codex login. Click Refresh to update the status.
- Choose a Default Model.

When you chat with Codex, the chat box also shows Reasoning and Speed buttons so you can pick the reasoning effort and service tier for the selected model.
Custom LLM (OpenAI-compatible)
Use this for a self-hosted model or any service with an OpenAI-compatible API.
- Click Add below the provider list and choose Custom LLM (OpenAI-compatible)....
- Fill in Name, Host (for example
localhost:3006), Sub Path (for example/v1), and API Key if the server needs one. - Choose a Default Model.
Custom agent (ACP)
You can plug in any coding agent that supports the Agent Client Protocol, such as Claude Code (through an ACP adapter) or Gemini CLI. TablePlus starts the agent on your Mac and chats with it. The agent can't read your files or run terminal commands from TablePlus.
- Click Add below the provider list and choose Custom Agent (ACP)....
- Fill in:
- Name: how the agent appears in the chat.
- Command: the agent executable, either a command on your shell
PATHor an absolute path, for exampleclaude-agent-acp. - Arguments: extra arguments for the command, for example
--acp. - Environment: extra environment variables, one
KEY=VALUEper line, for exampleANTHROPIC_API_KEY=.... These are stored in the macOS Keychain.
- Click Test Agent to check that TablePlus can start the agent.
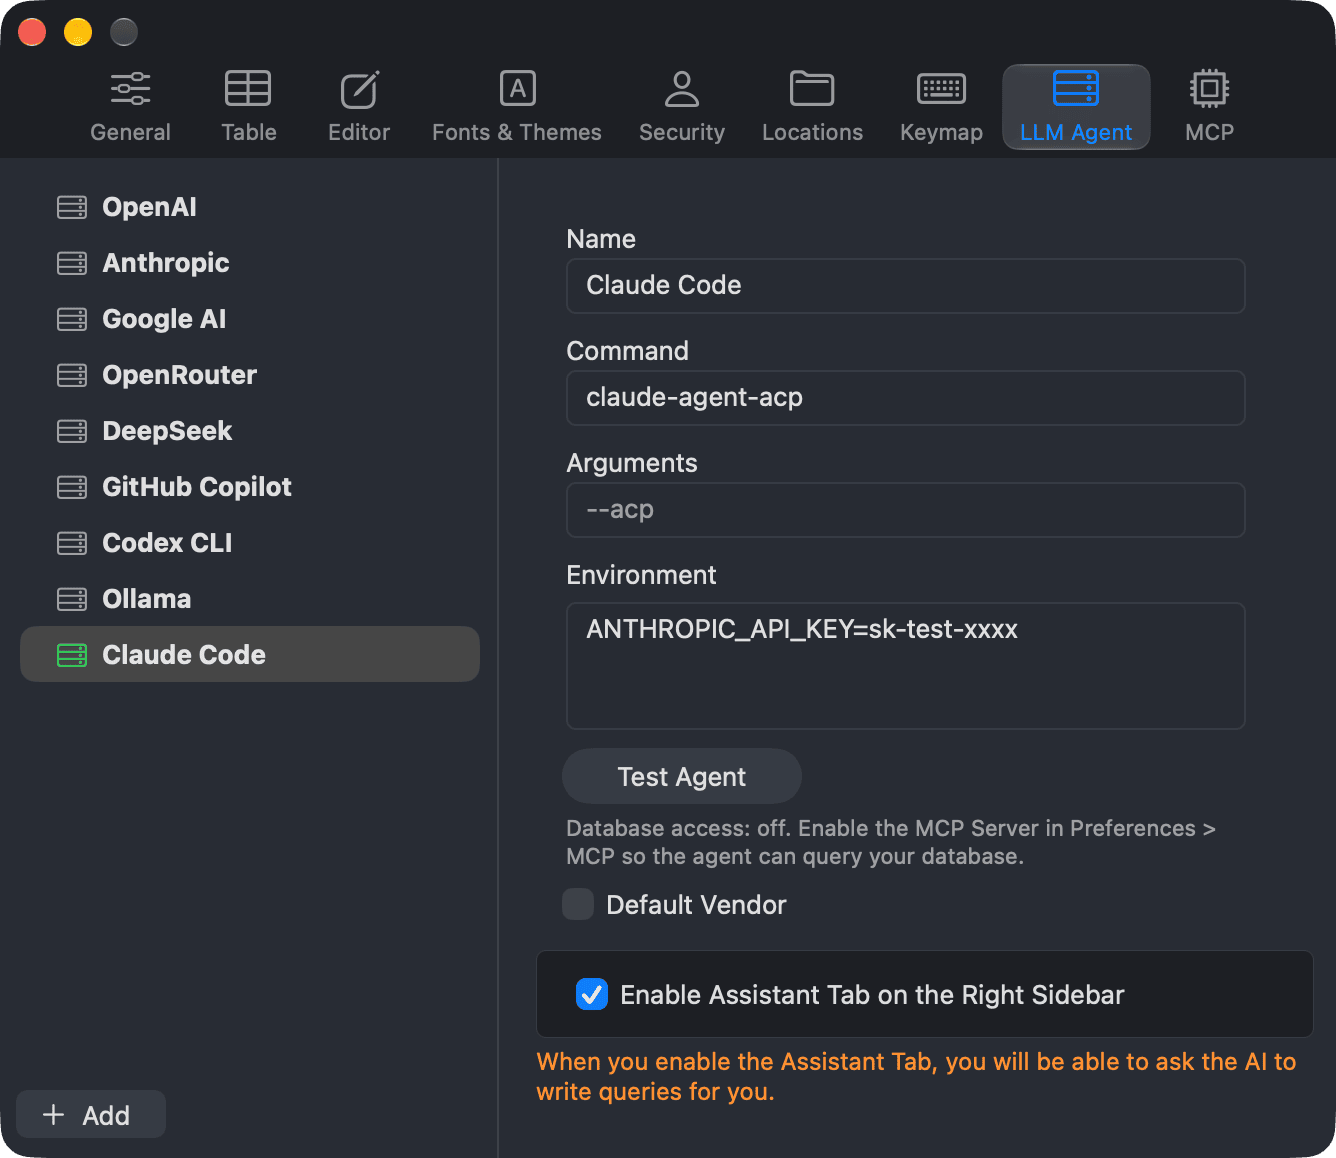
A custom agent can only query your database when the TablePlus MCP Server is on. See Database access for agents.
To remove a custom provider, right-click it in the list and choose Delete. Built-in providers can't be removed.
Chat with the assistant
- Open a connection and click Assistant at the top of the right sidebar.
- Choose a provider and a model with the buttons in the chat box.
- Type your question in Ask anything... and press
Returnto send it. PressShift + Returnto add a new line.
Click the stop button to cancel a response that is still coming in.
Add tables as context
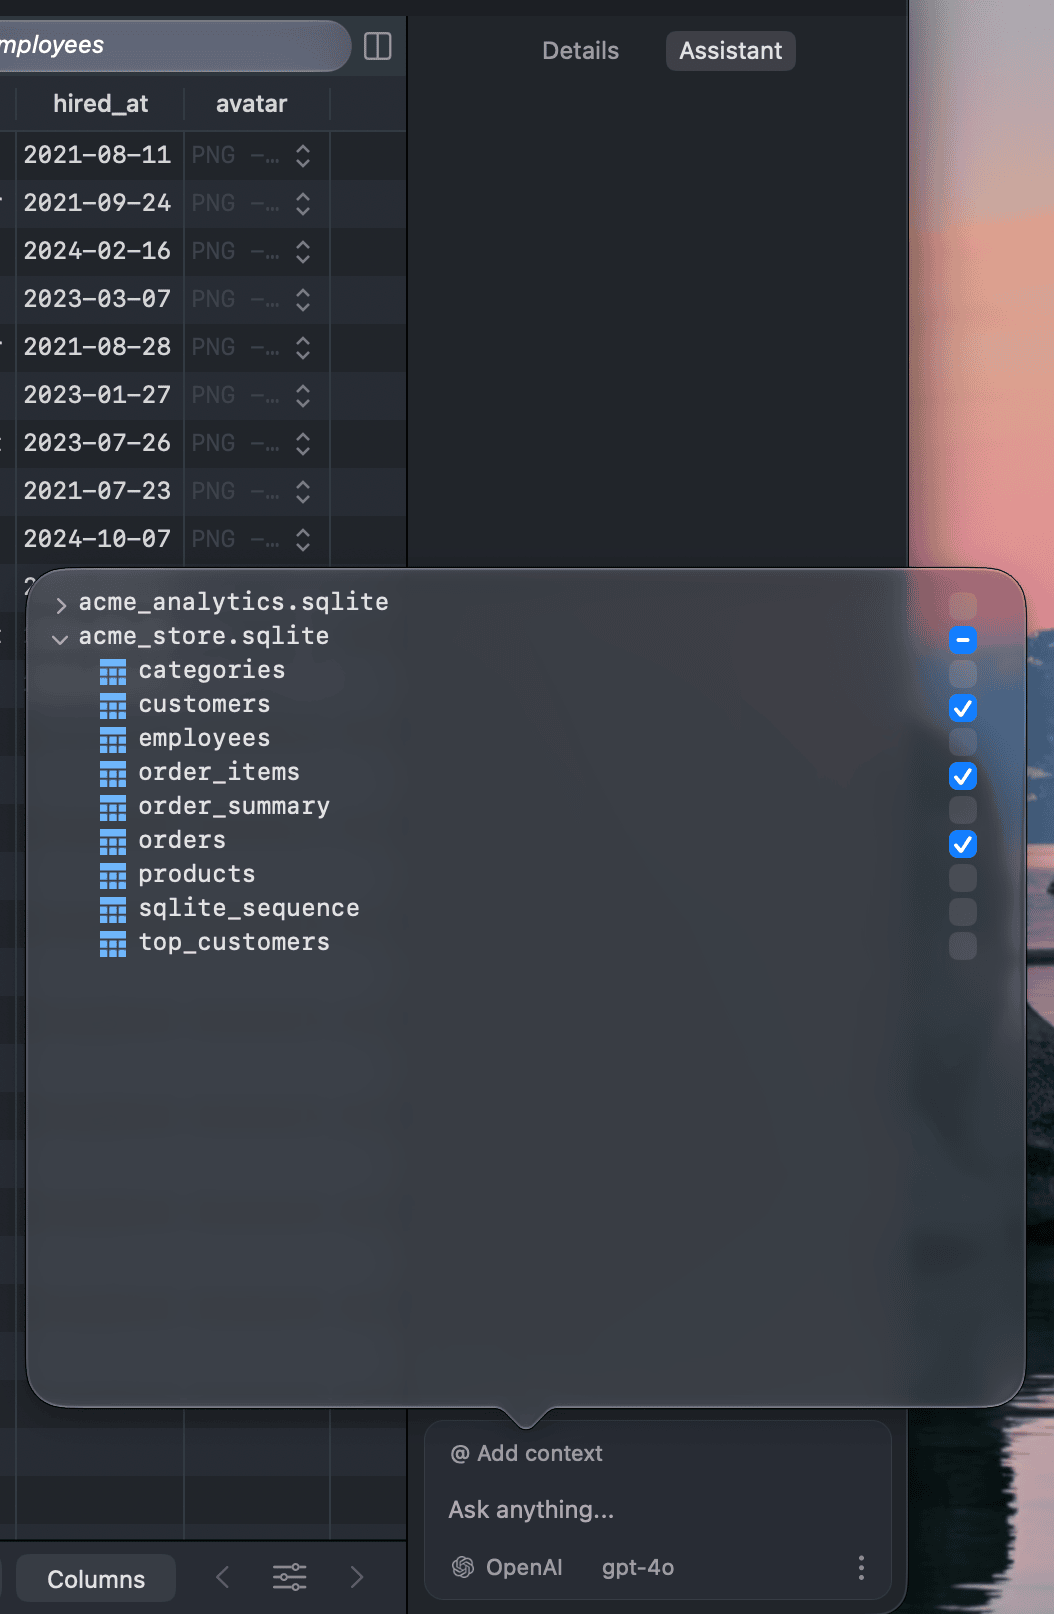
To help the assistant write accurate queries, click @ Add context and check the tables and views it should know about. TablePlus adds their structure (the CREATE statement) to the conversation.
Run the generated SQL
Each SQL code block in a reply has two buttons:
- Copy: copy the code to the clipboard.
- Run: add the code to the SQL editor and run it.
Hover over a message to copy, resend, or delete it.
Let the assistant run queries
The assistant can also query the current database by itself, for example to check the data before answering:
- Read-only queries (such as
SELECT) run directly. If the connection has safe mode enabled, TablePlus asks for confirmation as usual. - Any other query needs your approval first. An Approve SQL button appears in the chat box. Click it to review the SQL and the database it will run on, then click Approve to run it or Cancel to reject it. Safe mode still applies after you approve.

Manage chats
Click the menu button in the chat box to:
- New Chat: start a new conversation.
- Clear Chat: remove all messages from the current conversation.
- History: open a recent conversation, or search your past conversations.
- Settings..: open the LLM Agent preferences.
Database access for agents
All built-in providers and custom OpenAI-compatible providers get access to the current database automatically. Custom ACP agents use the TablePlus MCP Server instead:
- Open Preferences > MCP.
- Check Enable MCP Server.
The custom agent settings show whether the agent has database access. Query approval and safe mode apply in the same way as above.
Use TablePlus from other AI tools
The MCP Server also lets other AI tools, such as Codex or Claude Code, work with your TablePlus connections. See MCP Server for all options. In Preferences > MCP:
- Client Setup shows the configuration to copy into Codex, Claude Code, or another client (Manual), or the address of the HTTP Server.
- Access Token lets you create tokens with Read Only, Read & Write, or Full Access permissions, limit them to some connections, and revoke them. By default, TablePlus generates a token automatically for the
tableplus-mcpcommand. - Approval needed for unsafe query asks you to approve non-read queries before they run (on by default).
- Allow remote access (TLS) lets other machines connect. Use Export Certificate… to install the server's certificate on the remote machine.
- Activity shows the requests made by MCP clients.

Privacy
The assistant is a chat client. It sends requests directly from your Mac to the provider or agent you configured. Nothing goes through TablePlus servers, so if you block access to a provider, the assistant can't use it.
What the provider receives:
- Your messages and the conversation so far.
- The structure (
CREATEstatement) of the tables you add as context. - Details about the current connection, such as the database name, driver, and server version, when the assistant asks for them.
- The results of the queries the assistant runs. Only queries you approved, or read-only queries, are run, but their results, including data rows, are sent to the provider.
Your provider may store and process this data under its own terms. If your data must stay on your machine, use a local model, for example with Ollama.